
Quick Links
Lab 2: A Cooperative, User-Level Thread Package
Due Date: Feb 10, 11:59pm
In this lab, you will create a library of functions that define a user-level threads package. Using your library, a program will be able to create threads, destroy them, and run them concurrently on a single processor.
Background on Threads
Threads and processes are key abstractions for enabling concurrency in operating systems. To gain a deeper understanding of how these abstractions are constructed, this project asks you to build the core of a user-level threads package. Building kernel-level threads and processes is much different, but we'll do this project at user level since installing new kernels on the lab machines is problematic.
Threads provide the illusion that different parts of your program are executing concurrently. Through the years, a model of executing multithreaded programs has emerged as a defacto standard. In this model, threads share the code, heap, and the runtime system. Each thread, however, has a separate stack and, naturally, a separate set of CPU registers. This programming model also provides synchronization primitives so that different threads can coordinate access to shared resources.
User-Level vs. Kernel Threads
For practical reasons, this project is done at user level: you will construct user threads by implementing a set of functions that your program will call directly to provide the illusion of concurrency. In contrast, modern operating systems provide kernel threads, and a user program invokes the corresponding kernel thread functions via system calls. Both types of threads use the same core techniques for providing the concurrency abstraction; you would build kernel threads in essentially the same way you build user threads in this project. Also, kernel processes are built using these techniques.
However, there are a few differences between kernel and user threads:
- Multiprocessing
- Whereas user-level threads provide the illusion of concurrency, on machines
with multiple processors, kernel-level threads can provide actual
concurrency. With user-level threads, the kernel schedules the user process on
one CPU, and the user-level threads package multiplexes the (kernel) thread
associated with the process between one or more (user-level) threads. With
kernel-level threads, the kernel is aware of the different (kernel) threads, and
it can simultaneously schedule these threads from the same process on different
processors.
A key simplifying assumption for this project is that you will allow programs to multiplex some number (e.g., m) of user-level threads on one kernel thread. This means that at most one user-level thread is running at a time and that your runtime system has complete control over the interleaving of user-level threads with each other. More sophisticated systems implement m on n threads packages where m user-level threads are multiplexed across n kernel threads. - Asynchronous I/O
- When a user-level thread makes a system call that blocks (e.g., reading a file from disk), the kernel scheduler moves the process to the Blocked state and will not schedule it until the I/O has completed. Thus, even if there are other user-level threads within that process, they have to wait, too. Conversely, when a kernel thread blocks for a system call, the kernel scheduler is aware that other threads in the same process may be ready to run. Thus, some kernel threads may be running while others are waiting for I/O.
- Timer interrupts
- In the next lab, we will simulate timer interrupts that cause the scheduler to switch from one thread or process to another by using POSIX signals. In your implementation, the threads library will "turn off interrupts" by blocking delivery of these signals using system calls. However, there is nothing to prevent the threads, themselves, from "turning off interrupts" the same way. Thus, even though we will implement "preemptive" threads, a "malicious" thread could turn off interrupts and not be preempted until it calls yield, thus hogging the CPU. Note that kernel schedulers don't have this problem. Only the privileged code in the kernel can turn off the real timer interrupts.
Using Threads
With your threads library, a typical program will look like:
int
main(int argc, char **argv)
{
    // Some initialization
    // Create some threads
    // wait for threads to finish
    // exit
}

// "main" function for thread i
thread_main_i (...)
{
    // do some work
    // yield
    // do some more work
    // return (implicit thread exit)
}
Here thread_main_i is a programmer-supplied "main" function that the ith thread starts executing (note that different threads may have the same "main" function). The thread can perform useful work by calling any other functions in the program, or voluntarily yielding to other threads.
A thread exits either explicitly or implicitly. It exits explicitly when it calls the thread_exit function in the thread library. It exits implicitly when its thread_main function returns. Additionally, to add more control to the program, a thread may call thread_kill to force other threads to exit as well.
Thread Context
Each thread has per-thread state that represents the working state of the thread -- the thread's program counter, local variables, stack, etc. A thread context is a subset of this state that must be saved/restored from the processor when switching threads. (To avoid copying the entire stack, the thread context includes a pointer to the stack, not the entire stack.) Your library will store the thread context in a per-thread data structure (this structure is sometimes called the "thread control block").
Saving/Restoring Thread Context
When a thread yields the CPU, the threads library must save the current thread's context, which contains the processor register values at the time the thread yields the CPU. The library restores the saved context later when the thread gets its turn to run on the processor. Additionally, the library creates a fresh context and a new stack when it creates a thread.
Fortunately, the C runtime system allows an application to retrieve its current context and store it in a memory location, and to set its current context to a predetermined value from a memory location. Your library will make use of these two existing library calls: getcontext and setcontext.
Study the manual pages of these two calls. Notice that getcontext saves the current context into a structure of type struct ucontext of type ucontext_t. So, if you allocate a struct ucontext and pass a pointer to that memory to a call to getcontext, the current registers and other context will be stored to that memory. Later, you can call setcontext to copy that state from that memory to the processor, restoring the saved state.
The struct ucontext is defined in /usr/include/sys/ucontext.h. Look at the fields of this struct in detail, especially the uc_mcontext and the uc_sigmask fields.
You will use getcontext and setcontext in two ways. First, to suspend a currently running thread (to run another one), you will use getcontext to save its state and later use setcontext to restore its state. Second, to create a new thread, you will use getcontext to create a valid context, but you will leave the current thread running; you (the current thread, actually) will then change a few registers in this valid context to initialize it as a new thread, and put this new thread into the ready queue; finally, at some point, the new thread will be chosen by the scheduler, and it will run when setcontext is called on this new thread's context.
Changing Thread Context
As noted above, when creating a thread, you can't just make a copy of the current thread's context (using getcontext). You need to make a copy and then change four things:
- You need to change the program counter to point to the first function that the thread should run.
- You need to allocate a new stack.
- You need to change the stack pointer to point to the top of the new stack.
- You need to setup the parameters to the first function.
In the real world, you would take advantage of an existing library function, makecontext, to make the first, third and fourth changes. The advantage of using this function is that it abstracts away the details of how a context is saved in memory, which simplifies things and helps portability. The disadvantage is that it abstracts away the details of how a context is saved in memory, which might leave you vague on exactly what's going on.
In the spirit of "there is no magic", for this lab you should not use makecontext or swapcontext. Instead, you must manipulate the fields in the saved ucontext_t directly.
- You will change the program counter to point to a stub function, described below, that should be the first function the thread runs.
- You will use malloc to allocate a new per-thread stack.
- You will change the stack pointer to point to the top of the new stack. (Warning: in x86-64, stacks grow down!)
- You will initialize the argument registers, described below, with the arguments that are to be passed to the stub function.
What is the stub function? How do the arguments work? Read on.
Stub Function
When you create a new thread, you want it to run the thread_main function that defines the work you want the thread to do. A thread exits implicitly when it returns from its thread_main function, much like the main program thread is destroyed by the OS when it returns from its main function in C, even when the main function doesn't invoke the exit system call. To implement a similar implicit thread exit, rather than having your thread begin by running the thread_main function directly, you should start the thread initially in a "stub" function that calls the thread_main function of the thread (much like main is actually called from the crt0 stub function in UNIX). In other words, thread_create should setup a thread so that it starts running the thread_stub function shown below. Then, when the thread runs for the first time, it will execute thread_stub, which will call thread_main. Then, your thread_main function can return to the stub function, should it return.
/* thread starts by calling thread_stub. The arguments to thread_stub are the
 * thread_main() function, and one argument to the thread_main() function. */
void
thread_stub(void (*thread_main)(void *), void *arg)
{
	Tid ret;

	thread_main(arg); // call thread_main() function with arg
	ret = thread_exit();
	// we should only get here if we are the last thread.
	assert(ret == THREAD_NONE);
	// all threads are done, so process should exit
	exit(0);
}
In the above code, the argument thread_main is a pointer to the thread_main function that describes the real work the thread should do. Notice that in C, a function's name refers to the address of its code in memory. The second argument to thread_stub (arg) is the argument to pass to the thread_main function. We'll have the thread_main function take an argument that is a pointer to an arbitrary type so that you can pass it whatever you want. thread_exit, THREAD_SELF, and THREAD_NONE are defined below.
Contexts and Calling Conventions
The context structure contains many data fields, but you only need to deal with four of them when creating new threads: the stack pointer, the program counter, and two argument registers. Other than that, you don't need to worry about the fields within the context variable, as long as you do not tamper with them. Also, it is a good idea to use variables that have been initialized through a getcontext call in order to not have bizarre behavior.
Under the Posix C calling conventions in x86-64, here's what things look like while any given function is executing:
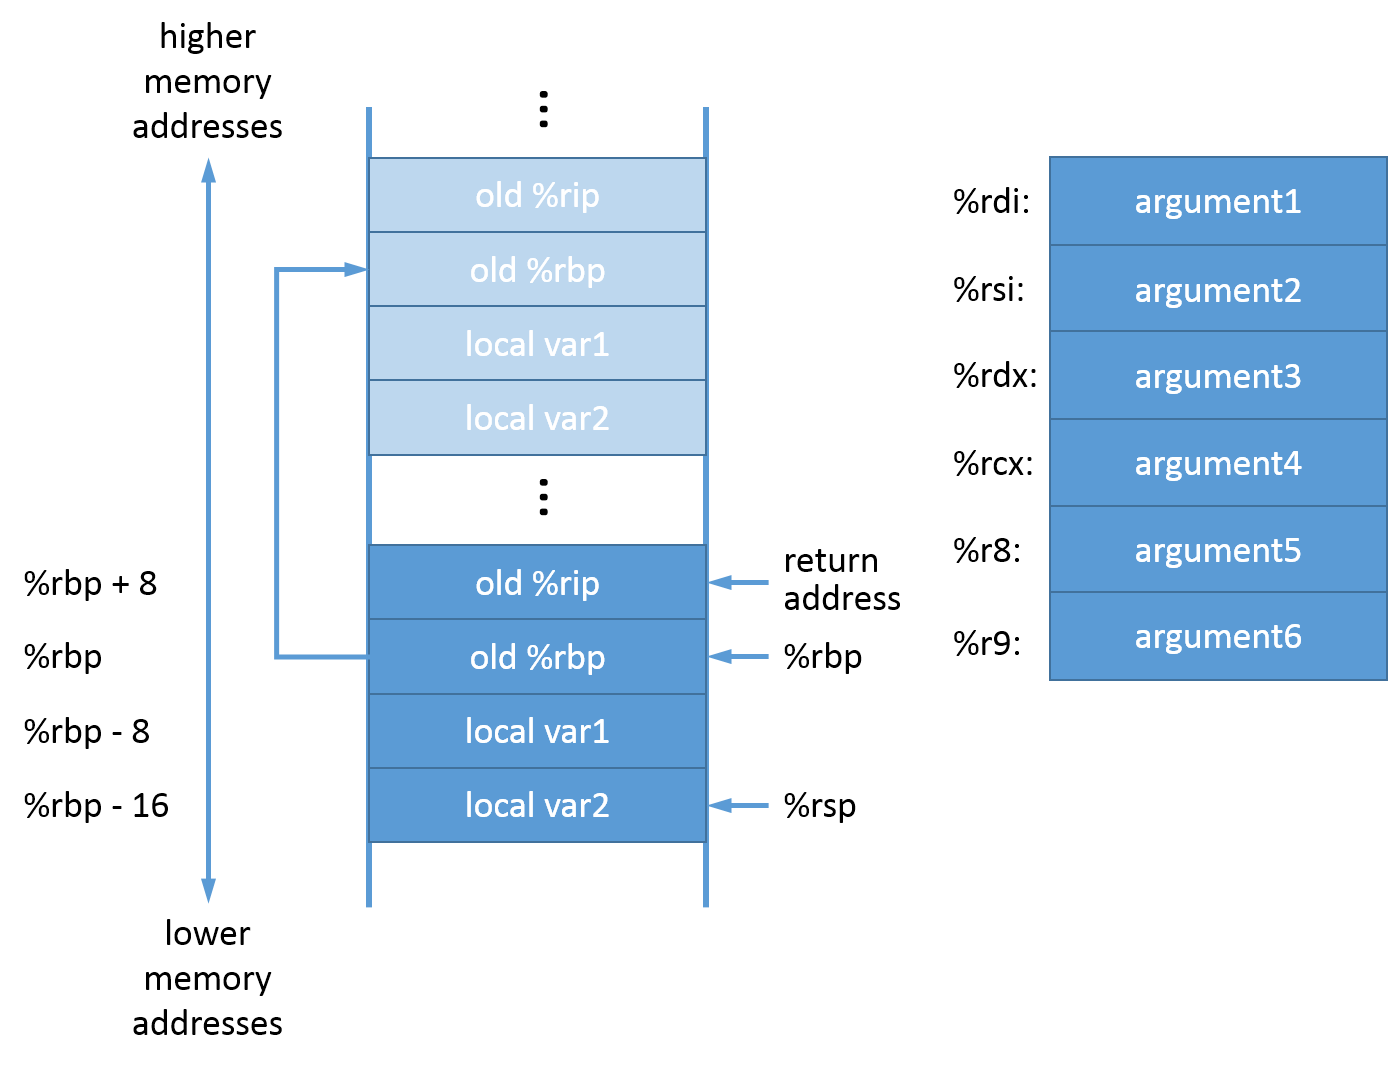
Notice that while a procedure executes, it can allocate stack space by moving the stack pointer down (stack grows downwards). However, it can find local variables, parameters, return addresses, and the old frame pointer (old %rbp) by indexing relative to the frame pointer (%rbp) register because its value does not change during the duration of a function call.
When a function needs to make a function call, it copies the arguments of the "callee" function (the function to be called) to the registers shown on the right in the x86-64 architure. For example, the %rdi register will contain the first argument, the %rsi register will contain the second argument, etc. Then the caller saves the current instruction pointer (%rip) into the stack (shown as "return address" in the figure), and changes the instruction pointer to the callee function. At this point the stack pointer (%rsp) points to the return address (shown in the figure). Note that the stack pointer points to the last pushed value in the stack.
The callee function then starts executing. It first pushes the the frame pointer value of the caller function (shown as old %rbp) into the stack, and then sets the frame pointer (%rbp) to the current stack pointer (%rbp = %rsp), so that it points to the old frame pointer value. Then the callee function decrements the stack pointer (shown as %rsp), and uses the space between the frame pointer and the stack pointer for its local variables, for saving or spilling other registers, etc. As an example, these three steps are performed by the first three instructions (push, mov and sub) in the main function shown below. The callee locates its variables, parameters, and the return address, by using addresses relative to the fixed frame pointer (%rbp).
To return to the caller, a procedure simply copies the frame pointer (%rbp) to the stack pointer (%rsp = %rbp), effectively releasing the current frame. Then it pops the top stack item into %rbp to restore the %rbp of the caller function, and then uses the ret instruction to pop the old instruction pointer off the stack into the instruction register (%rip), returning control to the caller function. These steps are performed by the last two instructions (leaveq, retq) in the main function shown below.
This is a gdb listing for the test_basic program that we will provide you for this lab. Run gdb on it (or on any program that you have compiled on the lab machines), as shown below, to see the instructions at the start and the end of a function (e.g., main function). Make sure that you understand what these instructions are doing, and are able to answer the questions in the listing below.
$ cd threads
$ gdb test_basic
...
(gdb) b main
Breakpoint 1 at 0x4009ab: file test_basic.c, line 7.
(gdb) r
...

Breakpoint 1, main (argc=1, argv=0x7fffffffe868) at test_basic.c:7
7               thread_init(0);
(gdb) disassemble main
Dump of assembler code for function main:
   0x000000000040099c <+0>:     push   %rbp
   0x000000000040099d <+1>:     mov    %rsp,%rbp
   0x00000000004009a0 <+4>:     sub    $0x10,%rsp
   0x00000000004009a4 <+8>:     mov    %edi,-0x4(%rbp)  // what is happening here?
   0x00000000004009a7 <+11>:    mov    %rsi,-0x10(%rbp) // what is happening here?
=> 0x00000000004009ab <+15>:    mov    $0x0,%edi
   0x00000000004009b0 <+20>:    callq  0x401edc <thread_init>
   0x00000000004009b5 <+25>:    mov    $0x0,%eax
   0x00000000004009ba <+30>:    callq  0x4009dc <test_basic>
   0x00000000004009bf <+35>:    mov    $0x0,%eax
   0x00000000004009c4 <+40>:    leaveq
   0x00000000004009c5 <+41>:    retq
End of assembler dump.
One complication with the Posix C x86-64 calling convention is that it requires the frame pointer %rbp to aligned to 16 bytes. This byte alignment means that the value of %rbp, or the stack location (stack address) to which %rbp points to, must be a multiple of 16. Otherwise, system libraries may crash.
When you are creating a new thread that will execute the thread_stub function, you will need to setup the stack so that this calling convention is followed. In particular, you will need to think about the byte alignment for the stack pointer and the frame pointer when control is transferred to thread_stub.
Setup
Make sure to go over the setup instructions for Lab 1, if you have not done so previously.
Add the source files for this lab, available in threads.tar, to your repository, and run make in the newly created threads directory.
cd ~/ece344
tar -xf /cad2/ece344s/src/threads.tar
git status # should say that "threads/" directory is untracked
git add threads
git commit -m "Initial code for Lab 2"
git tag Lab2-start
cd threads
make
Start by implementing show_ucontext.c. Replace all instances of "-1" in the various printf function calls with the appropriate code (also, make sure to not modify any code at the beginning of main, as suggested by the comment there). Make sure that you are able to answer all the questions mentioned in the source file, which will help you understand the stack layout and how a thread's context is saved and restored. It will also clarify the concepts about the thread context, introduced above.
The implementation will also give you a brief exposure to signals, an OS concept similar to hardware interrupts. The code in show_ucontext.c will show you how to disable or enable signals, and how these actions affect the saved thread context.
Make sure to finish implementing show_ucontext.c before moving to the implementation of the threads library. You can use the tester to test the output of your modified show_ucontext.c.
Cooperative Threads API
In this project, you will build a user level threads package. A key simplifying assumption in this lab is that the threads are cooperative, i.e., each thread runs until it explicitly releases the CPU to another thread by yielding the thread or by exiting. In contrast preemptive threading systems allow a scheduler to interrupt a running thread at any time and switch the CPU to running a different thread.
The thread package provides several functions calls to allow application programs to perform thread management. In addition, there are a few conventions that application programs must adhere to in order to ensure proper and safe operation. A list of the functions that constitute the User-level threads API can be found in the thread.h file. The functions that you will be implementing for this lab are summarized here:
- void thread_init(void):
- You can use this function to perform any initialization that is needed by your threading system. Here, you should also "custom" create the first user thread in the system. To do so, you should setup the (kernel) thread that is running when your program begins (before any calls to thread_create) as the first user thread in the system (with tid = 0). You will not need to allocate a stack for this thread, because it will run on the (user) stack allocated for this kernel thread by the OS.
- Tid thread_id():
- This function returns the thread identifier of the currently running thread. The return value should lie between 0 and THREAD_MAX_THREADS. See solution requirements below.
- Tid thread_yield(Tid tid):
- This function suspends the caller and activates the thread given by the identifier tid.
The caller is put on the ready queue and can be run later in a similar
fashion. A reasonable policy is to add the caller to the tail of the
ready queue to ensure fairness (so all other threads are run before this
thread is scheduled again - see the THREAD_ANY argument below). The value of tid may take the identifier of any available thread. It also can take any of the following constants:
- THREAD_ANY: tells the thread system to run any thread in the ready queue. A reasonable policy is to run the thread at the head of the ready queue, which ensures fairness. This policy is called FIFO (first-in, first-out), since the thread that first entered the ready queue (among the threads that are currently in the ready queue) is scheduled first. With preemptive scheduling, as introduced in Lab 3, your FIFO scheduler will ensure round-robin scheduling because all threads in the run queue will be scheduled for (roughly) an equal amount of time (a time slot) in a round-robin fashion.
- THREAD_SELF: tells the thread system to continue the execution of the caller. This function could be implemented as a no-op, but it may be useful to explicitly switch to the current thread for debugging purposes.
- THREAD_INVALID: alerts the caller that the identifier tid does not correspond to a valid thread.
- THREAD_NONE: alerts the caller that there are no more threads, other than the caller, that are available to run, in response to a call with tid set to THREAD_ANY.
- Tid thread_create(void (*fn)(void *), void *arg):
- This function creates a thread whose starting point is the
function fn. The second argument, arg, is a pointer that will
be passed to the function fn when the thread starts executing. The
created thread is put on a ready queue but does not start execution yet. The
caller of the function continues to execute after the function returns. Upon
success, the function returns a thread identifier of type Tid. If the
function fails, it returns a value that indicates the reason of failure as
follows:
- THREAD_NOMORE: alerts the caller that the thread package cannot create more threads. See solution requirements below.
- THREAD_NOMEMORY: alerts the caller that the thread package could not allocate memory to create a stack of the desired size. See solution requirements below.
- Tid thread_exit():
- This function ensures that the current thread does not run after
this call, i.e., this function should not return, unless it fails as
described below. A thread that is created later should be able to reuse
this thread's identifier, but only after this thread has been destroyed.
The function may fail, in which case, this thread continues running, and
returns
the following:
- THREAD_NONE: alerts the caller that there are no more other threads that can exit, i.e., this is the last thread in the system.
- Tid thread_kill(Tid tid):
- This function kills another thread whose identifier
is tid. The tid can be the identifier of any available
thread. The killed thread should not run any further and the calling thread
continues to execute. Upon success, this function returns the identifier of
the thread that was killed. Upon failure, it returns the following:
- THREAD_INVALID: alerts the caller that the identifier tid does not correspond to a valid thread, or is the current thread.
Solution Requirements
The first thread in the system (before the first call to thread_create) should have a thread identifier of 0. Your threads system should support the creation of a maximum of THREAD_MAX_THREADS concurrent threads by a program (including the initial main thread). Thus, the maximum value of the thread identifier should thus be THREAD_MAX_THREADS - 1 (since thread identifiers start from 0). Note that when a thread exits, its thread identifier can be reused by another thread created later.
Your library must maintain a "thread control block" (a thread structure) for each thread that is running in the system. This is similar to the process control block that an operating system implements to support process management. In addition, your library must maintain a queue of the threads that are ready to run, so that when the current thread yields, the next thread in the ready queue can be run. Your library allows running a fixed number of threads (THREAD_MAX_THREADS threads), so if it is helpful, you could allocate these structures statically (e.g., as a global array).
Each thread should have a stack of at least THREAD_MIN_STACK size. Your implementation must not statically allocate all stacks at initialization time (e.g., using a global data structure). Instead, you must dynamically allocate a stack (e.g., using malloc()) whenever a new thread is created (and delete one each time a thread is destroyed.)
As noted above, your library must use getcontext and setcontext to save and restore thread context state, but it may not use makecontext, or swapcontext or any other existing code to manipulate a thread's context; you need to write the code to do that yourself.
Your code must not make calls to any existing threads libraries (e.g., Linux pthreads), or borrow code from these libraries for this lab.
You may borrow any code for data structures, e.g., linked list, that you have implemented in the previous ECE344 labs. Do not use any code from other students, or from code available on the Internet. When in doubt, please ask us.
Hints and Advice
This project does not require writing a large number of lines of code. It does require you to think carefully about the code you write. Before you dive into writing code, it will pay to spend time planning and understanding the code you are going to write. If you think the problem through from beginning to end, this project will not be too hard. If you try to hack your way out of trouble, you will spend many frustrating nights in the lab.
As a start, here are some questions you should answer before you write code.
- What fields will you need in your thread structure? Perhaps the most important is the thread state (e.g., running, etc.). Think about all the states that you will need to support.
- getcontext "returns" twice. When it is called directly, it initializes the context structure that is passed as an argument, and then execution continues after the getcontext() call. Then, when setcontext() is called later, execution returns to the instruction following the getcontext() call, which appears to be a second "return", since the code continues running from the instruction following getcontext(). For this lab, you will use this behavior, once when you create a context, and again when you switch to that context. What action will you take in each case? How will you tell which case you are in?
- Most threads are created with thread_create, but the initial thread is there before your library is invoked. Nonetheless, the original thread must be able to thread_yield to let other threads run, and other threads must be able to call thread_yield and let the original thread run. How is this going to work?
- A hard bug to find would be an overflow or underflow of the stack you allocate. How might such a bug manifest itself? What defensive programming strategies can you use to detect stack overflow in a more controlled manner as the system runs?
- Note that when the initial thread in a C process returns, it calls the exit system call, which causes the OS to destroy the process, even if you have other user level threads in the process that want to run. How will you ensure that the program exits only when the last thread in your system exits?
- Be careful. It is dangerous to use memory once it has been freed. In particular, you should not free the stack of the currently running thread in thread_exit while it is still running. So how will you make sure that the thread stack is eventually deallocated? How will you make sure that another thread that is created in between does not start using this stack (and then you inadvertently deallocate it)? You should convince yourself that your program would work even if you used a debugging malloc library that overwrites a block with dummy data when that block is free()'d.
- Be careful. If you destroy a thread that is holding or waiting on a resource such as a lock (we will be implementing locks in the next lab), problems can occur. For example, deadlock may occur because the thread holding the lock may not have a chance to release the lock. Similarly, if the thread waiting on a lock is destroyed, then the thread releasing the lock may wake up some other thread incorrectly (e.g., due to reusing thread id). For this reason, it is important to ensure that when thread_kill is invoked on a thread, the target thread should not exit immediately. Instead, the target thread should exit when it runs the next time. How will you implement this functionality? In practice, operating systems provide a signal handler mechanism that allows threads to clean up their resources (e.g., locks) before they exit.
- What are the similarities and differences between thread_yield and thread_exit? Think carefully. It will be useful to encapsulate all that is similar in a common function, which will help reduce bugs, and possibly make your code simpler.
We strongly recommend that your first milestone might be for thread_yield(THREAD_SELF) to work for the initial thread (where your implementation stores and then restores the caller's state). Get this working before you try to implement thread_create or thread_exit.
Use a debugger. As an exercise, put a breakpoint at the instruction after you copy the current thread's state using getcontext. You can print the current values of the registers (in gdb, type info registers).
(gdb) info registers
rax            0x0      0
rbx            0x0      0
rcx            0x7ffff7a926b1   140737348445873
rdx            0x605910 6314256
rsi            0x0      0
rdi            0x0      0
rbp            0x7fffffffdec0   0x7fffffffdec0
rsp            0x7fffffffdea0   0x7fffffffdea0
r8             0x7ffff7dd8e60   140737351880288
r9             0x7ffff7a55c60   140737348197472
r10            0x8      8
r11            0x246    582
r12            0x400970 4196720
r13            0x7fffffffe850   140737488349264
r14            0x0      0
r15            0x0      0
rip            0x4024de 0x4024de
eflags         0x246    [ PF ZF IF ]
cs             0x33     51
ss             0x2b     43
ds             0x0      0
es             0x0      0
fs             0x0      0
gs             0x0      0
You can print the values stored in your thread struct and the thread context. For example, say current is a pointer to the thread structure associated with the currently running thread, and context is a field in this structure that stores the thread context. Then, in gdb, you can use p/x current->context to print the context stored by a call to getcontext.
You may find this particularly useful in making sure that the state you "restore" when you run a newly-created thread for the first time makes sense.
Frequently Asked Questions
We have provided answers to various frequently asked questions (FAQ) about the lab. Make sure to go over them. We have provided answers to many questions that students have asked in previous years, so you will save time by going over these answers as you start working on the lab.
Start early, we mean it!
Testing Your Code
We have provided the program test_basic.c for testing this lab. Use it to test your code.
You can also test your code by using our auto-tester program at any time by following the testing instructions.
Using Git
You should only modify the following files in this lab.
show_ucontext.c
thread.c
You can find the files you have modified by running the git status command.
You can commit your modified files to your local repository as follows:
git add show_ucontext.c thread.c
git commit -m "Committing changes for Lab 2"
We suggest committing your changes frequently by rerunning the commands above (with different meaningful messages to the commit command), so that you can go back to see the changes you have made over time, if needed.
Once you have tested your code, and committed it (check that by running git status), you can tag the assignment as done.
git tag Lab2-end
This tag names the last commit, and you can see that using the git log or the git show commands.
If you want to see all the changes you have made in this lab, you can run the following git diff command.
git diff Lab2-start Lab2-end
More information for using the various git commands is available in the Lab 1 instructions.
Code Submission
Make sure to add the Lab2-end tag to your local repository as described above. Then run the following command to update your remote repository:
git push
git push --tags
For more details regarding code submission, please follow the lab submission instructions.
Please also make sure to test whether your submission succeeded by simulating our automated marker.