You are viewing RobertLinSite, print version or are not using a standards-compliant browser if this note appears. Contents are still accessible, but to view the site in its full glory, read the accessibility notes.
blog /
Captain's blog: 2005/12
Making Chocolate Treats
Posted Tuesday, December 06, 2005 at 12/06/2005 09:58:00 PM
 Here are some tiny photos from the introduction to working with chocolate workshop, as part of our department team-builder activity day at a chocolate store and school called js bonbons on Dupont street.
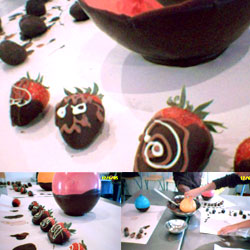
 The main picture shows most of what we made at this two-hour afternoon workshop.
The chocolate bowl, seen at the top right, was made first. As you can see more clearly in the lower pictures, a balloon is used as a form for the chocolate bowl. Everyone dipped their own balloon into a steel bowl of warm liquid chocolate to coat the bottom, and then set the balloon on parchment paper to cool. After cooling it was coated only a second time. Jenn the instructor said that for larger bowls, we would have had to give it at least three coatings, but for our current size, two coatings were enough.
The chocolate-coated strawberries in the foreground were made after the bowl, in a similar manner, except that after ten seconds of placing the coated strawberry on the paper, we slid it sideways and then lifted it away from the base so that the strawberry wouldn’t have a base like the chocolate bowl. Decoration was done with white chocolate as well as the lighter milk chocolate poured to fill paper cones that were cut at the tips to allow a fine line of chocolate to ooze out. We had to re-heat the tip of our cones by leaning the tips against the water pot on the stove, but other than that it was straightforward. You can see my attempt here at making a face with one of the strawberries.
In the very background, you can see strange lumps. These are the truffles, and we had about six or so different flavours of the pure truffle material. The vanilla truffle material was easy to work with, but the Earl Gray Tea was super-tough even to pull out of the container. They were then hand-rolled into ball-shaped lumps. Then we did the messiest task, the outer coating, which required dipping the truffles into the liquid chocolate and then rolling them in our fingers before rolling them onto the paper. Our fingers just kept getting thicker and thicker with chocolate! Truffles were later decorated by Jenn to distinguish different flavoured truffles from each other now that they were all coated on the outside now in same-coloured chocolate.
In the end (not shown here) we pooled all our work into a huge tray and then each grabbed what they wanted into their own chocolate bowls, before finally bringing it to Jenn so she could clear-wrap and ribbon-tie it up for us. That was the end of our fun workshop.
If there is anything I would do differently in the unlikely event that I were to make similar chocolate treats at home, I would wear gloves, or else use chopsticks, spoons and any combination of tools to do the work without getting any of that sticky chocolate on my hands. Even now after washing my hands several times, my hands still smell like chocolate!
Material notes:
- Couveture chocolate, made of 31 to 39% cocoa butter, was the main ingredient, used for our chocolate bowl and for doing most of the coating.
- Milk Chocolate was the ligher-coloured chocolate we used for some coating and decorative lines
- White chocolate was used for the white streaks
More
See archives »
Blogging info
Blogging enabled by Blogger.