You are viewing RobertLinSite, print version or are not using a standards-compliant browser if this note appears. Contents are still accessible, but to view the site in its full glory, read the accessibility notes.
home /
Home
A Personal Bank for your Ideas
Posted Sunday, February 25, 2007 at 2/25/2007 12:47:00 AM
 Sometimes a great idea comes to you out of the blue, but before you can think any further about the idea, you have to dash off and attend to a dozen other things. Afterwards, what remains is only a lingering feeling, a vague awareness that you had a great idea earlier, but you can no longer remember what it was. For thousands of years, creative practical people have probably solved this annoyance by tying knots or scribbling ideas on something, so they could go about their daily business first and revisit those ideas at a more convenient time later.
Continuing with the approach of scribbling ideas down, I made a little web-based tool which basically allows you to fill out a form, roughly categorize the entry, automatically have it date-time stamped and saved for later review. Like a piggy bank that grows with every contribution, you can build a large personal bank of ideas. Then, whenever you want to draw upon the collected knowledge in your personal bank of ideas, simply use the search feature to display and sort ideas.
So if this sounds useful to you, and you don’t mind that it’s still a work in progress, I’ve made this tool available as an Open Source project at SourceForge. Visit the ideasBank project to download and install on your own PHP, MySQL-enabled server.
Additional projects will be released in the future on SourceForge as well.
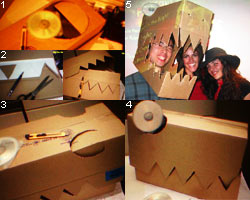
Cardboard Dinosaur Head
Posted Saturday, October 28, 2006 at 10/28/2006 01:24:00 PM
 Here is my cardboard dinosaur costume from this week's Fright Night staff party. Other than the individual costume contest event (I just participated - Mona Lisa was the winner followed by the impaled Jesus costume), there was also a group costume contest, the pumpkin carving contest, and a meeting room converted into a haunted house attraction.
 This cardboard dinosaur can be made anywhere you can find two cardboard boxes that can fit your head, two shiny CDs or DVDs for the eyes and basic office supplies. No glue is necessary, tape if you want to do this faster. Refer to the numbers in the photo and follow along.
- 0. Joining and Hinges
- This step isn’t shown, sorry. Just ensure the two boxes are joined and hinged at the back in some way. I used a glue-less approach using tabs and slots to join the boxes, but you can just use tape instead.
- 1. Neck
- Make a hole and make sure your head can fit easily into the box, without being too large or the costume head may slide downward. I used a DVD to trace incrementally larger holes until there was perfect fit.
- 2. Teeth and Jaws
- To help make it consistent, start with one side and put a piece of paper over the area you are cutting, so that you cut both the paper and the cardboard together. In this way the paper keeps the exact shape of the cut and you can then use it as a template to make the other side identical. The trick with the lower jaw is to use the upper jaw to trace a matching teethline for the lower jaw, so that the jaws will meet and actually close together easily. The lower jaw should have a much larger section uncut at the back that can serve to catch and hold the upper jaw open later when you wear the costume.
- 3. Fitting the eyes
- Use the DVDs to trace round holes for the eyes, but the holes should be just smaller than the DVDs so that it will be a tight fit which holds the DVDs in place. Otherwise if the hole is not small enough the DVDs may just drop out of the hole. In my case I had an additional plastic DVD case with a spine that just happened to hook onto the inside of the hole too - but tape could have also been used here. Also, fit the DVDs at an angle so anyone can see the DVDs from both the front and side views.
- 4. Carve nostrils
- Not shown here, but you can add finishing touches such as nostrils.
- 5. Go to the party.
- You can keep the jaws open all the time to easily eat the Halloween party food, or close it like a knight’s helmet visor for additional protection when entering the haunted house. Have fun!
Superman, IMAX 3D
Posted Saturday, July 01, 2006 at 7/01/2006 12:35:00 AM
 Today was a department team-builder day in which we went to see the Superman Returns IMAX 3D version at the Paramount. It was my turn to organize this, and my only regret was that two people couldn’t join us for the film due to the late afternoon start time conflicting with their long weekend plans. I liked the film, which was also a first IMAX 3D experience for me. Overall, it was a great activity day.
The itinerary, for future planning purposes:
- Before 1210
- Called for reservations. Emailed last minute details to the team, with a Photoshop’d Google map to drivers depicting the underground parking entrances, but this was probably overkill.
- 12:10
- Intended to leave early at this time, to allow time for parking, before our 12:40 lunch reservation.
- 12:17
- Approximate time that we actually left.
- 12:30
- Entered Milestones restaurant after parking, lingered for a few minutes waiting for the other half of the group before getting seated. Enjoyed Kobe Beef Meatloaf, trading food, splitting appetizers, the gelato dessert with a mint sprig in it (mint was also in the virgin Mojito drinks some had) along with some odd horror storytelling.
- 14:15
- Left restaurant. Group split again, some visiting street shops at random. We went to the Silver Snail for comic collectibles, followed by a brief stop at Active Surplus.
- 15:00
- Regrouped and entered Paramount Festival Hall Theatre, picked up our advance-purchased tickets upstairs. One person went ahead to try and hold center seats while the rest of us were busy getting popcorn and other concession stand food. I just had a large yogurt or ice cream swirl.
- 15:15
- Entered IMAX theatre. An attendant handed us the polarized IMAX 3D glasses we would need to wear during some parts of the film. We managed to get middle row seating, but on the side only, so probably if we had come even earlier we could have gotten center seating.
- 15:30
- The IMAX 3D pre-experience starts in which they do the standard smoke-and-mirrors laser show, where you learn that IMAX is Canadian and the location of speakers. I wonder if IMAX theatres in the United States perform the same thing. Then the actual film began.
- 17:17
- End of credits, and left the theatre, split for home and the long weekend.
Superman Returns, as a film, had interesting imagery and references. Someone pointed out the imagery of Atlas supporting a globe. I just kept seeing the standard JC poses. I liked the
Any sufficiently advanced technology is indistinguishable from magicquote, which is by Sci-Fi writer Arthur C. Clarke, although they didn’t mention his name in the movie. The shuttle launch method reflected recent developments. The 2004 Paul Allen-Burt Rutan winning of the Ansari X-prize comes to mind, with their SpaceShipOne/White Knight system, where a little space shuttle called SpaceShipOne is lifted for the bulk of the journey by a mother aircraft, White Knight, before launching itself into space. On a separate note, it was good that the EMP bursts were conveyed rather simply with mostly power-outages, and that was probably all that was needed anyway. No scenes of folks dropping dead from pacemaker failures or pigeons crashing in London’s Trafalgar square as seen in The CORE. Overall a fun film with repeat-viewing potential.
Making Chocolate Treats
Posted Tuesday, December 06, 2005 at 12/06/2005 09:58:00 PM
 Here are some tiny photos from the introduction to working with chocolate workshop, as part of our department team-builder activity day at a chocolate store and school called js bonbons on Dupont street.
 The main picture shows most of what we made at this two-hour afternoon workshop.
The chocolate bowl, seen at the top right, was made first. As you can see more clearly in the lower pictures, a balloon is used as a form for the chocolate bowl. Everyone dipped their own balloon into a steel bowl of warm liquid chocolate to coat the bottom, and then set the balloon on parchment paper to cool. After cooling it was coated only a second time. Jenn the instructor said that for larger bowls, we would have had to give it at least three coatings, but for our current size, two coatings were enough.
The chocolate-coated strawberries in the foreground were made after the bowl, in a similar manner, except that after ten seconds of placing the coated strawberry on the paper, we slid it sideways and then lifted it away from the base so that the strawberry wouldn’t have a base like the chocolate bowl. Decoration was done with white chocolate as well as the lighter milk chocolate poured to fill paper cones that were cut at the tips to allow a fine line of chocolate to ooze out. We had to re-heat the tip of our cones by leaning the tips against the water pot on the stove, but other than that it was straightforward. You can see my attempt here at making a face with one of the strawberries.
In the very background, you can see strange lumps. These are the truffles, and we had about six or so different flavours of the pure truffle material. The vanilla truffle material was easy to work with, but the Earl Gray Tea was super-tough even to pull out of the container. They were then hand-rolled into ball-shaped lumps. Then we did the messiest task, the outer coating, which required dipping the truffles into the liquid chocolate and then rolling them in our fingers before rolling them onto the paper. Our fingers just kept getting thicker and thicker with chocolate! Truffles were later decorated by Jenn to distinguish different flavoured truffles from each other now that they were all coated on the outside now in same-coloured chocolate.
In the end (not shown here) we pooled all our work into a huge tray and then each grabbed what they wanted into their own chocolate bowls, before finally bringing it to Jenn so she could clear-wrap and ribbon-tie it up for us. That was the end of our fun workshop.
If there is anything I would do differently in the unlikely event that I were to make similar chocolate treats at home, I would wear gloves, or else use chopsticks, spoons and any combination of tools to do the work without getting any of that sticky chocolate on my hands. Even now after washing my hands several times, my hands still smell like chocolate!
Material notes:
- Couveture chocolate, made of 31 to 39% cocoa butter, was the main ingredient, used for our chocolate bowl and for doing most of the coating.
- Milk Chocolate was the ligher-coloured chocolate we used for some coating and decorative lines
- White chocolate was used for the white streaks
Throwing Pottery
Posted Thursday, September 29, 2005 at 9/29/2005 11:39:00 PM
We had a great department team-builder day. Well, it wasn’t a full day like the Centre Island one, but this was good enough. We started with lunch at The Queen Mother Café on Queen, where I enjoyed some appetizers, delicious Pad Thai and pumpkin cheese cake.After The Queen Mother we headed over to the Gardiner Museum of Ceramic Art at their temporary location near OCAD, and began our pottery class for the rest of the afternoon. This was my first time throwing pottery. Throwing pottery actually just means working with clay on a rotating plate. Apparently it is called throwing because in old English, the word for throwing actually also related to turning and twisting, according to this explanatory article I found.
The experienced instructor, Karen, demonstrated how to do everything properly such as securing the clay, squishing it down and up several times to align it, compressing to reinforce the bottom, adding water to keep the clay from drying up, and removing the masterpiece with a wet wire once it was finished. Then we started our individual lumps of clay and wheels. I managed to make a crude bowl, flower vase, and at the last minute, with no time to thin the walls, I mashed together a thick stubby cup without handles.
We helped with the cleanup, and moved our creations to the shelves of the firing kiln room, so that they could be baked in the oven after a bit of drying. Karen also mentioned the option to come in over the weekend to buy the paints and add colour during their Sunday drop-in hours if anyone wanted. We left a contact number so she could contact us in about two weeks when our pottery would be ready to be picked up. Overall, a fun experience.
Well, it wasn’t as fun as the three-day Kingston, Ottawa, Montreal, Quebec City bus tour with the whole family a few weeks ago, where we wandered off the official tour at night and accidentally came across the historic battlefield, the Plains of Abraham as well as a few Martello towers. But today’s pottery class was good enough.
More
See archives »