You are viewing RobertLinSite, print version or are not using a standards-compliant browser if this note appears. Contents are still accessible, but to view the site in its full glory, read the accessibility notes.
blog /
Captain's blog: 2006/10
Cardboard Dinosaur Head
Posted Saturday, October 28, 2006 at 10/28/2006 01:24:00 PM
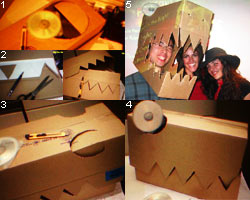 Here is my cardboard dinosaur costume from this week's Fright Night staff party. Other than the individual costume contest event (I just participated - Mona Lisa was the winner followed by the impaled Jesus costume), there was also a group costume contest, the pumpkin carving contest, and a meeting room converted into a haunted house attraction.
 This cardboard dinosaur can be made anywhere you can find two cardboard boxes that can fit your head, two shiny CDs or DVDs for the eyes and basic office supplies. No glue is necessary, tape if you want to do this faster. Refer to the numbers in the photo and follow along.
- 0. Joining and Hinges
- This step isn’t shown, sorry. Just ensure the two boxes joined and hinged at the back in some way. What I did was a glue-less approach using tabs and slots to join the boxes, but you can just use tape to join and make a hinge.
- 1. Neck
- Make a hole and make sure your head can fit easily into the box, without being too large or the costume head may slide downward. I used a DVD to trace incrementally larger holes until there was perfect fit.
- 2. Teeth and Jaws
- To help make it consistent, start with one side and put a piece of paper the area you are cutting, so that you cut both the paper and the cardboard together. In this way the paper keeps the exact shape of the cut and you can then use it as a template to make the other side identical. The trick with the lower jaw is to use the upper jaw to trace a matching teethline for the lower jaw, so that the jaws will meet and actually close together easily. The lower jaw should have a much larger section uncut at the back that can serve to catch and hold the upper jaw open later when you wear the costume.
- 3. Fitting the eyes
- Use the DVDs to trace round holes for the eyes, but the holes should be just smaller than the DVDs so that it will be a tight fit which holds the DVDs in place. Otherwise if the hole is not small enough the DVDs may just drop out of the hole. In my case I had an additional plastic DVD case with a spine that just happened to hook onto the inside of the hole too - but you can use tape too. Also, fit the DVDs at an angle so anyone can see the DVDs from both the front and side views.
- 4. Carve nostrils
- Not shown here, but you can add finishing touches such as nostrils.
- 5. Go to the party.
- You can keep the jaws open all the time to easily eat the Halloween party food, or close it like a knight’s helmet visor for additional protection when entering the haunted house. Have fun!
More
See archives »
Blogging info
Blogging enabled by Blogger.