In my last filter design post, I selected a Chebyshev filter response as the best fit for the bispectrum visualizer. In this post, let’s put some numbers to the response so that we can realize the filter as an electronic circuit.
Finding a design procedure
There are many online calculators and “canned” software packages that give the electronic component values based on a user-supplied filter response. For this project I wanted to work through the design process employed by these programs, but I also didn’t want to spend time deriving the filter response nor re-inventing circuit topologies.
Instead, I found a middle ground by following a paper-and-pencil design procedure presented in Lonnie C. Ludeman’s “Fundamentals of Digital Signal Processing” (1986, Harper & Row Publishers Inc.), specifically in Chapter 3, “Analog Filter Design”.
Follow the procedure
The design procedure starts by putting numbers to the ideal Chebyshev response curve, quoted from page 137 below (included here under fair dealing copyright guidelines):
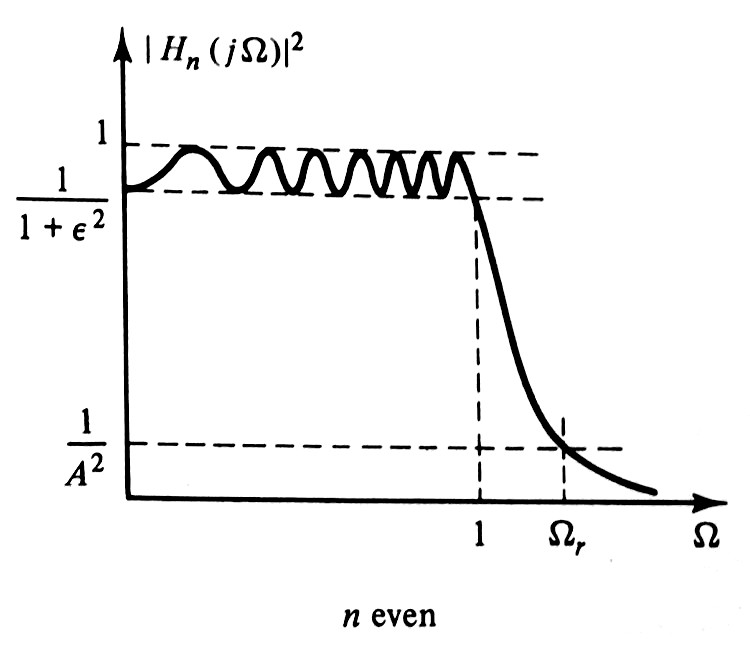
This curve is shown for a normalized even-order (n) low pass filter whose cut-off frequency is 1 rad/s.
First, I’m going to select the stop frequency to be the Nyquist frequency of the standard CD audio sampling rate of 44.1 kHz, so let Ωr = 22000 * 2π rad/s.
Next, the cut-off frequency (at which the linear gain is equal to 1/(1+ϵ^2)) needs to be selected. The lower the cut-off frequency, the less sharp the transition between the cut-off and stop bands, the lower the filter order, and the simpler the circuit. So this should be set as low as reasonably possible. Even though humans can hear sounds as high as 20 kHz (depending on the person), most commonly encountered sounds exist below 12 kHz as shown by this frequency plot of various common sounds. Why 12 kHz instead of 10 or 14? This is where I’m making an educated guess in balancing the need to capture the desired frequency content against the need to not build an overly complicated filter circuit. So, I selected 12 kHz for the cut-off frequency; this means the 1 rad/s cut-off frequency shown in the above Chebyshev response curve will be scaled to 12000 * 2π rad/s (as per the low-pass to low-pass filter transformation described in Chapter 3 of Ludeman’s textbook cited above).
Now let’s select the maximum passband ripple. The Chebyshev response allows us to have a sharper transition from pass to stop band if we’re willing to accept more passband ripple. In this application, let’s set a maximum 10% reduction in the signal magnitude in the passband; this corresponds to 1 dB of allowable passband ripple. As per the ideal Chebyshev response curve above, the passband ripple is the same as the attenuation at the cut-off frequency. So, by choosing a 1 dB passband ripple, the attenuation at the cut-off frequency will be 1 dB as well.
As for the filter order, let’s select a 4th order filter mainly out of convenience: since many op-amp ICs are two op-amps in one, we can realize two 2nd-order filter stages using one IC.
At this point, all the response parameters are defined except for the stopband attenuation (1/A^2). Based on the equations 3.27 and 3.28 given in chapter 3 of Ludeman’s textbook, one can calculate the required filter order to realize a given set of Chebyshev filter specifications. In our case, we want the filter order to be no larger than n = 4, so instead we’ll calculate the largest stopband attenuation that can be achieved given the rest of the filter parameters. So for a 4th order Chebyshev filter with 1 dB passband ripple, 12 kHz cutoff, and 22 kHz stop frequency, the highest achievable stopband attenuation is 30 dB.
30 dB corresponds to a linear gain of at most 0.032 V/V at 22 kHz (a gain that only decreases as the frequency increases beyond 22 kHz). The ADC on the TIVA LaunchPad has only 12 bits of resolution distributed between 0 and 3.3 V, which means any unwanted signal due to aliasing needs to be attenuated enough to fit within the 0.8 mV quantization step size of the ADC – in other words, unwanted signal with an amplitude of less than 0.4 mV at the ADC input will, for the most part, not be included in the digital representation of the signal. Now the big unknown is the strength of the noise at and above 22 kHz. Though I don’t know how much noise to expect until the circuit is built, with a 30 dB attenuation at the beginning of the stop band, the largest signal voltage that could be more-or-less “hidden” from the ADC, if applied before the filter, would be 12 mV. This will be handy to know to prepare for the possibility of troubleshooting noise problems in the actual circuit.
Selecting a filter topology
We need an active filter topology to realize this Chebyshev filter. Though there are several options available, I’m going to narrow it down to the simplest two options: the Sallen-Key and Multiple Feedback (MFB) topologies. At first, based on this video overview of the two topologies, it seems like Sallen-Key is a good choice since it is less noisy than the MFB. Yet further searching reveals someone’s question regarding the noise properties of the two topologies, and the guy in that video actually answers the question to clarify that the noise gain of the Sallen-Key starts to increase at the “mid frequencies” while the MFB noise gain decreases as frequency increases. This, combined with the fact that the Sallen-Key starts to pass very high frequencies after a certain point, leads me to select the MFB topology for this application.
(Of course, if this were not a hobby project and more were riding on the filter’s performance, I would conduct a more in-depth analysis and perhaps even implement the filter using both topologies and compare the performance, but I believe that would be overkill for what I’m trying to do here.)
Calculating the component values
The MFB topology has one other handy property: its transfer function has the same form as the Chebyshev response transfer function, which basically means that its component values can be calculated such that the resulting electronic filter will have a Chebyshev response. So, we can read the required transfer function coefficients from Tables 3.4 and 3.5 from Ludeman’s analog filter design chapter, and then set these equal to the corresponding coefficients in the MFB topology transfer function. Since the MFB transfer function is written in terms of its component (resistor and capacitor) values, it becomes a matter of resolving a system of equations.
By this point I had put the entire design procedure into a spreadsheet (Filter_Design_4thOrder_MFB_Chebyshev_foronline), and proceeded to determine the component values using guess and check while only “guessing” using values from tables of standard resistor and capacitor values. This way, I can obtain reasonable resistances and capacitances that can be purchased in a single reasonably-sized component.
Simulating the filter
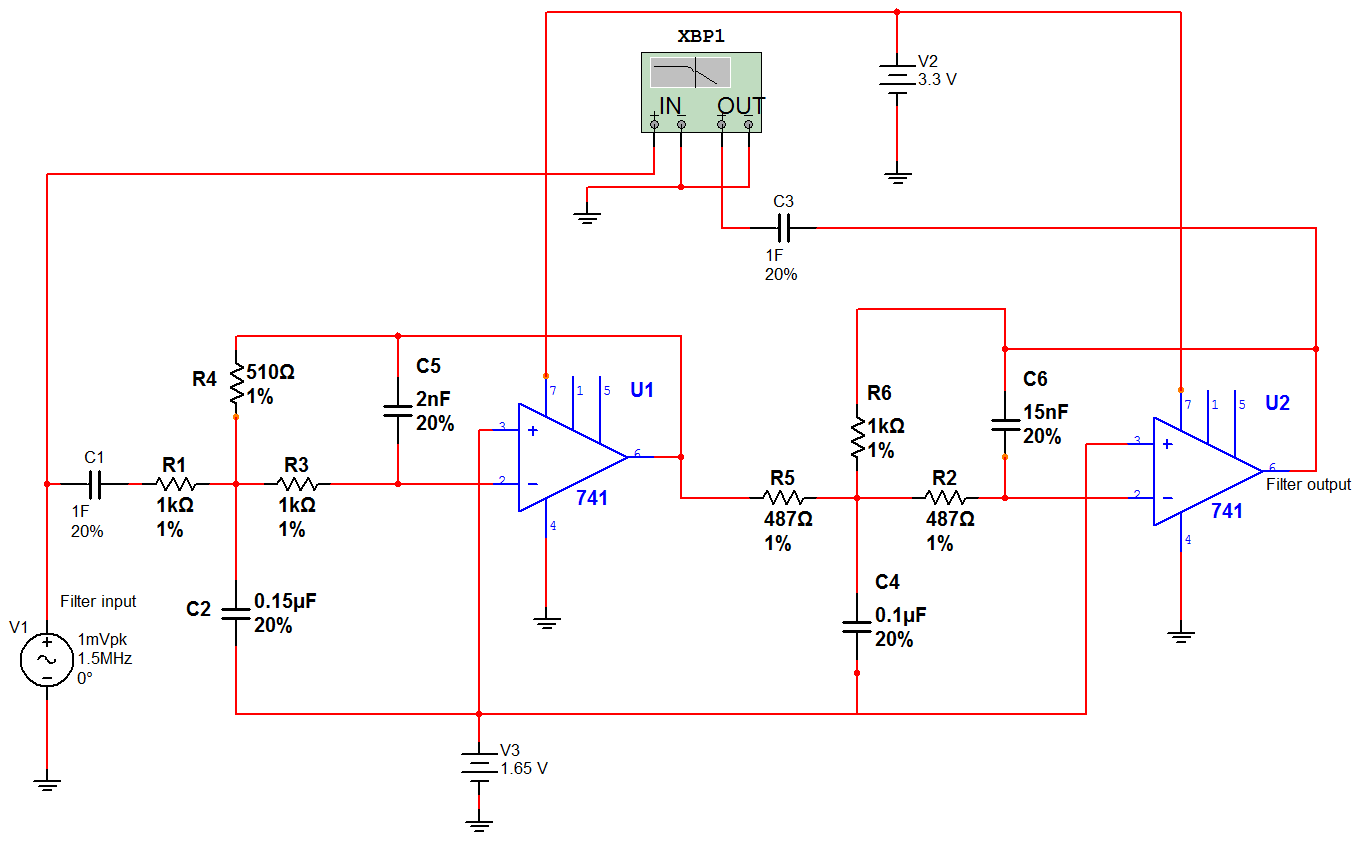
Using Multisim I simulated the resulting two stage filter. In particular, I’m using a unipolar design as I won’t have -3.3 V available to me, so the input signal gets biased to half the supply voltage (half of 3.3 V, or 1.65 V). The 1 F capacitors at the input and output stages will be replaced by a more realistic value when I build the circuit, but for now they are placeholders that won’t affect the simulated low frequency response. Here’s the schematic I drew in Multisim:
The XBP1 component is a virtual instrument that makes Bode plots. Here is the frequency plot generated by XB1 representing the response of the simulated filter (plotted in Octave):

It turns out that, with the selected real-world component values, as well as whatever non-ideal model parameters Multisim takes into account for the 741 op-amp, the response is somewhat less ideal compared to what we would expect from the theoretical Chebyshev response curve. We do get a 1 dB passband ripple, but only up to about 6 kHz, while 6 to 12 kHz sees an additional 2 dB drop, resulting in a cumulative 3 dB attenuation by the time we get to the 12 kHz cut-off frequency. So I ask for a 1 dB passband ripple, but get 3 dB instead. A 3 dB attenuation corresponds to a maximum 29% decrease in signal amplitude. As mentioned in a previous post, passband flatness is not necessary because the bispectrum does not care as much about the relative magnitude of the signals in the passband; for this reason, the cumulative 3 dB attenuation (up to 29% decrease in signal amplitude) at the cut-off frequency (12 kHz) is acceptable for the application. Luckily, the stop band, which starts at 22 kHz, has the 30 dB attenuation I requested. This filter response is adequate for the bispectrum visualizer, so this design step is complete.